trvrm.github.io

Nginx and UWSGI on Ubuntu 14

Thu 01 January 2015


The documentation for Nginx and UWSGI is long and complex, but with ubuntu 14 it's actually pretty straightforward to get them up and running.

I present here a a setup that uses nginx and uwsgi emperor to host multiple python web applications simultaneously on an ubuntu 14 machine.

First, the packages

$ sudo apt-get install nginx
$ sudo apt-get install uwsgi uwsgi-emperor uwsgi-plugin-python

Our configuration files will now be under /etc/nginx and /etc/uwsgi-emperor

You can start, stop, and reload nginx as follows:

$ sudo service nginx start
$ sudo service nginx stop
$ sudo service nginx reload

The last command is useful when changing configuration settings.

Now set up a site by creating a file in /etc/nginx/sites-available

#/etc/nginx/sites-available/mysite
server{

    server_name     your_host_name;

    location /app1 {
        uwsgi_pass unix:/tmp/app1.socket;
        include uwsgi_params;
    }
    location /app2 {
        uwsgi_pass unix:/tmp/app2.socket;
        include uwsgi_params;
    }
}

Then,

$ sudo ln -s /etc/nginx/apps-available/mysite /etc/nginx/sites-enabled

Warning

A previous version of this tutorial had the sockets placed in /run/uwsgi . This was a mistake, because under Ubuntu /run is mounted as a tmpfs , and its content will be deleted on reboot Your uwsgi sub-directory will vanish and the uwsgi services will not restart.

Next, set up your 'vassals' (http://uwsgi-docs.readthedocs.org/en/latest/Emperor.html)

Create /etc/uwsgi-emperor/vassals/app1.ini as follows:

[uwsgi]
plugin = python
processes = 2
socket = /tmp/app1.socket
chmod-socket = 666

chdir = /srv/app1
wsgi-file = /srv/app1/main.py

uid = www-data
gid = www-data

And for your second application, create /etc/uwsgi-emperor/vassals/app2.ini as similarly:

[uwsgi]
plugin = python
processes = 2
socket = /tmp/app2.socket
chmod-socket = 666

chdir = /srv/app1
wsgi-file = /srv/app2/main.py

uid = www-data
gid = www-data

The simple act of creating or touching a .ini file in /etc/uwsgi-emperor/vassals will cause the emperor process to try to restart your application.

Of course, your applications don't exist yet, so let's create them. The simplest wsgi application can be only a few lines long:

Create /srv/app1/main.py

def application(env, start_response):
    start_response('200 OK', [('Content-Type','text/html')])
    return ["Hello World, I am app1"]

And /srv/app2/main.py

def application(env, start_response):
    start_response('200 OK', [('Content-Type','text/html')])
    return ["I, however, am app2. "]

And that's it!

Visiting http://your_host_name/app1 or http://your_host_name/app2 should return the text you put in the python files.

PDF Generation With Pelican

Thu 01 January 2015


The existing documentation is a little unclear on this, because it says you need to add PDF_GENERATOR=True to your pelicanconf.py file.

This advice is out of date: PDF generation has been moved to a plugin.

So you need to first make sure you have rst2pdf installed:

$ sudo apt-get install rst2pdf

and then add the following to pelicanconf.py

PLUGIN_PATH = '../pelican-plugins'  # or wherever.
PLUGINS = ['pdf']

However, doing this seems to screw up the pygments highlighting on my regular html output. This is because deep in the rst2pdf code, in a file called pygments2style.py , all the pygment elements have their CSS classes prepended with pygment- . I haven't figured out how to generate HTML and PDF nicely at the same time.

Postfix

Thu 01 January 2015


Postfix is a ghastly horror that really should be quietly eliminated. But that truism hides a deeper issue - email itself is a ghastly horror, the result of 30 years of hacks, edge-cases, non-conformant implementations and competing design constraints, that only persists because we still haven't come up with anything better.

Take the simple question 'what is a valid email address'.

I have a couple of standard regexes I use to validate email addresses, such as ^[A-Z0-9._%+-]+@[A-Z0-9.-]+.[A-Z]{2,4}$ , but having spent years building mailing systems, the best answer I can come up with is a valid email address is one that gets delivered to its destination.

So, Postfix. If you ever need a taste of purgatory, take some time to browse through the source code, a terrifying mix of old-school C and Perl. I once needed to create a utility to monitor the state of a Postfix DEFERRED queue, and found it was vastly easier to write my own queue parser in Python than understand the source to the existing qshape utility. Whoever wrote that clearly has an aversion to variable names that are more than one character long.

Actually configuring a functional Postfix system requires commiting yourself to a long pilgrimage across the net, picking up scattered bits of wisdom from the hardy travellers who have passed this way before, and recorded their insights in ancient forgotten blog posts and wiki pages.

Documents such as http://www.howtoforge.com/virtual-users-domains-postfix-courier-mysql-squirrelmail-ubuntu-10.04 include gems like 'this howto is meant as a practical guide; it does not cover the theoretical backgrounds'.

You have been warned, it seems to be saying. Configuring this system really requires at the very least a Masters degree in Advanced Email Hackery.

postfix flowchart

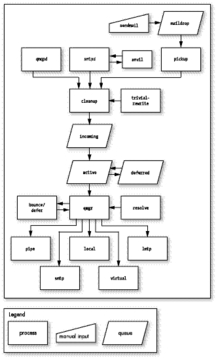
That image is from this article at Linux Journal, which is actually a pretty good and comprehensive introduction to the architecture of Postfix

The key insight that everything else hangs on is that Postfix is not a program. Postfix is a large collection of programs: some of which interact with the user, and a large number which run in the background and perform all the various tasks of gathering, processing and delivering email.

These programs, together with a rather complex set of folders under /var/spool/postfix that store messages as they work their way through the system, and another set of rather complex configuration files under /etc/postfix , are what comprises the complete mail delivery system.

To add to the fun, many postfix configuration settings can be stored in MySQL, and it's possible to run multiple postfix instances in parallel with each other.

$ pstree -a

├─master
│   ├─anvil -l -t unix -u -c
│   ├─pickup -l -t unix -u -c
│   ├─qmgr -l -t unix -u
│   ├─smtpd -n smtp -t inet -u -c -o stress= -s 2
│   └─tlsmgr -l -t unix -u -c
├─master
│   ├─anvil -l -t unix -u -c
│   ├─pickup -l -t unix -u -c
│   ├─qmgr -l -t unix -u
│   ├─smtpd -n smtp -t inet -u -c -o stress=
│   └─smtpd -n smtp -t inet -u -c -o stress=
├─master
│   ├─anvil -l -t unix -u -c
│   ├─pickup -l -t unix -u -c
│   ├─qmgr -l -t unix -u
│   ├─smtpd -n smtp -t inet -u -c -o stress=
│   └─smtpd -n smtp -t inet -u -c -o stress=
├─master
│   ├─anvil -l -t unix -u -c
│   ├─pickup -l -t unix -u -c
│   ├─qmgr -l -t unix -u
│   ├─smtpd -n smtp -t inet -u -c -o stress=
│   └─smtpd -n smtp -t inet -u -c -o stress=
├─master
│   ├─anvil -l -t unix -u -c
│   ├─pickup -l -t unix -u -c
│   ├─qmgr -l -t unix -u
│   ├─smtpd -n smtp -t inet -u -c -o stress=
│   └─smtpd -n smtp -t inet -u -c -o stress=

That's a lot of processes....

And yet, despite this, Postfix seems to be about the best there is. Over the last few years I've built and maintained a massively parallel mail delivery, management and monitoring system on top of Postfix that, at the last count, had successfully delivered almost 10 million messages for clients of Nooro Online Research.

Postgres JSON Aggregation

Thu 01 January 2015


I've been using the new JSON functionality in Postgres a lot recently: I'm fond of saying that Postgresql is the best NoSQL database available today. I'm quite serious about this: having used key-value and JSON stores such as CouchDB in the past, it's amazing to me how the Postgres developers have managed to marry the best of traditional relational technology with the flexibility of schema-free JSON documents.

As of version 9.3, postgres allows you to create JSON column types, and provides a number of functions to access and iterate through the data stored in them.

This week I discovered another hidden gem - json_agg() . This function lets you take the results from an aggregation operation and convert them into a JSON block - very helpful if you're then going to work with the returned data in a language like Python

To demonstrate this, we'll first set up some simple tables.

%load_ext sql
%config SqlMagic.feedback=False
%%sql
postgresql://testuser:password@localhost/test
u'Connected: testuser@test'
%%sql
CREATE TABLE IF NOT EXISTS person (
    name text primary key
);

INSERT INTO person (name) VALUES
('emily'),('arthur'),('nicki'),('oliver')
;
[]

We can query this in the usual way:

%sql SELECT * FROM person;
name
emily
arthur
nicki
oliver

But we can also use json_agg()

%sql SELECT json_agg(name) FROM person
json_agg
[u'emily', u'arthur', u'nicki', u'oliver']

Which gives us a single object to work with. So far, this isn't particularly helpful, but it becomes very useful when we start doing JOINS

%%sql
CREATE TABLE IF NOT EXISTS action(
    id serial primary key,
    created timestamp with time zone default now(),
    person_name text references person,
    type text not null
);

INSERT INTO action(person_name, type) VALUES ('emily','login');
INSERT INTO action(person_name, type) VALUES ('emily','pageview');
INSERT INTO action(person_name, type) VALUES ('arthur','login');
INSERT INTO action(person_name, type) VALUES ('emily','logout');
INSERT INTO action(person_name, type) VALUES ('nicki','password_change');
INSERT INTO action(person_name, type) VALUES ('nicki','createpost');
[]

If we want to ask Postgres to give us every user and every action they've performed, we could do it this way:

%sql SELECT person.name,  action.type , action.created FROM action JOIN person ON action.person_name=person.name
name type created
emily login 2014-11-08 17:45:05.963569-05:00
emily pageview 2014-11-08 17:45:05.964663-05:00
arthur login 2014-11-08 17:45:05.965214-05:00
emily logout 2014-11-08 17:45:05.965741-05:00
nicki password_change 2014-11-08 17:45:05.966274-05:00
nicki createpost 2014-11-08 17:45:05.966824-05:00

But then iterating through this recordset is a pain - I can't easily construct a nested for loop to iterate through each person and then through each action.

Enter json_agg()

%sql SELECT person.name,  json_agg(action) FROM action JOIN person ON action.person_name=person.name GROUP BY person.name
name json_agg
arthur [{u'person_name': u'arthur', u'type': u'login', u'id': 3, u'created': u'2014-11-08 17:45:05.965214-05'}]
emily [{u'person_name': u'emily', u'type': u'login', u'id': 1, u'created': u'2014-11-08 17:45:05.963569-05'}, {u'person_name': u'emily', u'type': u'pageview', u'id': 2, u'created': u'2014-11-08 17:45:05.964663-05'}, {u'person_name': u'emily', u'type': u'logout', u'id': 4, u'created': u'2014-11-08 17:45:05.965741-05'}]
nicki [{u'person_name': u'nicki', u'type': u'password_change', u'id': 5, u'created': u'2014-11-08 17:45:05.966274-05'}, {u'person_name': u'nicki', u'type': u'createpost', u'id': 6, u'created': u'2014-11-08 17:45:05.966824-05'}]

Which becomes much more usable in Python:

people = %sql SELECT person.name,  json_agg(action) FROM action JOIN person ON action.person_name=person.name GROUP BY person.name
for name, actions in people:
    print name
arthur
emily
nicki
for name, actions in people:
    print name
    for action in actions:
        print '\t',action['type']
arthur
    login
emily
    login
    pageview
    logout
nicki
    password_change
    createpost

So now we've managed to easily convert relational Postgres data into a hierarchical Python data structure. From here we can easily continue to XML, JSON, HTML or whatever document type suits your need.

Postgres Timestamps

Thu 01 January 2015


At my company, I maintain a large distributed. data collection platform . Pretty much every record we collect needs to be stamped with a created field. But because the incoming data comes from sources on various devices in multiple countries and timezones, making sure that the timestamps are precise and meaningful can be a challenge. Postgres can do this very elegantly, but can also trip you up in subtle ways.

Postgres has two subtly different timestamp data types: TIMESTAMP and TIMESTAMP WITH TIMEZONE .

The former stores year/month/day/hour/minutes/second/milliseconds, as you’d expect, and the later ALSO stores a timezone offset, expressed in hours.

We can switch between the two using the AT TIMEZONE syntax, but, and here is the tricky bit the function goes BOTH WAYS, and you can easily get confused if you don’t know what type you’re starting with.

Furthermore, Postgres will sometimes sneakily convert one to the other without you asking.

%load_ext sql
%config SqlMagic.feedback=False
%%sql
postgresql://testuser:password@localhost/test
u'Connected: testuser@test'
%sql SELECT NOW();
now
2014-08-18 22:33:58.998549-04:00

now() returns a TIMESTAMP WITH TIME ZONE . It shows the current local time, and the offset between that time and UTC (http://time.is/UTC)

But if we put the output from now() into a field that has type TIMESTAMP we will get a silent conversion:

%sql SELECT NOW():: timestamp
now
2014-08-18 22:33:58.998549

Which is not the current UTC time. We have stripped the timezone offset right of it. However, if we explicitly do the conversion, we get:

%sql SELECT NOW() AT TIME ZONE 'UTC';
timezone
2014-08-19 02:33:58.998549

Which is the current UTC time: (http://time.is/UTC)

It's worth reviewing the Postgresql documentation on this construct at this point.

Expression

Return Type

Description

timestamp without time zone AT TIME ZONE zone

timestamp with time zone

Treat given time stamp without time zone as located in the specified time zone

timestamp with time zone AT TIME ZONE zone

timestamp without time zone

Convert given time stamp with time zone to the new time zone, with no time zone designation

The danger here is that the AT TIMEZONE construct goes both ways. If you don't know what type you're feeding in, you won't know what type you're getting out. I've been bitten by this in the past; ending up with a timestamp that is wrong by several hours because I wasn't clear about my inputs.

Specifically, consider a table that looks like this:

%%sql
DROP TABLE IF EXISTS test;
CREATE TABLE test(name TEXT, created TIMESTAMP DEFAULT NOW());

Which I then populate:

%%sql
INSERT INTO test (name) VALUES ('zaphod beeblebrox');
INSERT INTO test(name,created) VALUES('ford prefect',now() at time zone 'utc');
SELECT * FROM test;
name created
zaphod beeblebrox 2014-08-18 22:34:03.620583
ford prefect 2014-08-19 02:34:03.621957

Note that the second record contains the current UTC time, but the first contains the current time local to the database server. This seems a good idea, and tends to work fine in local testing. But when you try to maintain a system where the database may be in one province, the data collected in another, and then reviewed in a third, you start to understand why this is too simplistic.

The fact that it's 10:12 now in Toronto isn't very helpful for a record that's getting created for a user in Halifax and is monitored from Vancouver.

So it's probably best to save timestamps WITH their timezone so as to avoid any ambiguity. This is the recommendation given here.

In our above example, the simplest approach is to change the table definition:

%%sql
DROP TABLE IF EXISTS test;
CREATE TABLE test(name TEXT, created TIMESTAMP WITH TIME ZONE DEFAULT (NOW() ));
%%sql
INSERT INTO test (name) VALUES ('zaphod beeblebrox');
INSERT INTO test(name,created) VALUES('ford prefect',now() );
SELECT * FROM test;
name created
zaphod beeblebrox 2014-08-18 22:35:15.988764-04:00
ford prefect 2014-08-18 22:35:15.989726-04:00

So now the dates are globally meaningful. But I still have to be careful, because if I use the wrong date format to populate this table, it'll still get messed up.

%sql INSERT INTO test(name,created) VALUES ('arthur dent',now() at time zone 'utc')
%sql SELECT * FROM test;
name created
zaphod beeblebrox 2014-08-18 22:35:15.988764-04:00
ford prefect 2014-08-18 22:35:15.989726-04:00
arthur dent 2014-08-19 02:35:15.990308-04:00

Note how arthur dent has completely the wrong created time.

Now, if I want to report on this data, I'm going to now have to specify which timezone I want the dates formatted too:

%sql delete from test WHERE name='arthur dent';
%sql select name, created FROM test;
name created
zaphod beeblebrox 2014-08-18 22:35:15.988764-04:00
ford prefect 2014-08-18 22:35:15.989726-04:00

gives me timestamps formatted in the timezone of the database server, which isn't necessarily particularly helpful, which may be helpful, but will be less so if the actual users of the data are in a different time zone.

%sql  SELECT name, created at time zone 'utc' FROM test;
name timezone
zaphod beeblebrox 2014-08-19 02:35:15.988764
ford prefect 2014-08-19 02:35:15.989726

gives me the time formatted in the UTC timezone, and

%sql select CREATED at time zone 'CST' FROM test;
timezone
2014-08-18 20:35:15.988764
2014-08-18 20:35:15.989726

gives me the time formatted for central standard time.

external data

Now so far we've been letting the database create the timestamps, but sometimes we want to save data provided to us from an external source. In this case it's very important the we know what timezone the incoming data comes from. So our middleware should require that all dates include a timestamp. Fortunately, if we're writing javascript applications, we get this automatically:

%%html
<div id="js-output"></div>
%%javascript
var d = JSON.stringify(new Date())
"2014-08-19T02:41:12.872Z"
import psycopg2,pandas
def execute(sql,params={}):
    with psycopg2.connect(database='test') as connection:
        with connection.cursor() as cursor:
            cursor.execute(sql,params)

So let's imagine that we got this string submitted to us by a client, and we're going to store it in the database via some Python code.

sql="INSERT INTO test (name, created) VALUES ( 'externally created date', %(date)s)"
params=dict(date="2014-08-19T02:35:24.321Z")
execute(sql,params)
%sql SELECT * FROM test
name created
zaphod beeblebrox 2014-08-18 22:35:15.988764-04:00
ford prefect 2014-08-18 22:35:15.989726-04:00
externally created date 2014-08-18 22:35:24.321000-04:00

And now we're getting to the point where all our timestamp data is both stored and displayed unambiguously.

Python Comprehensions

Thu 01 January 2015


Python list comprehensions are one of the most powerful and useful features of the language. However, I've noticed even quite experienced Python programmers using less powerful idioms when a list comprehension would be the perfect solution to their problem, and even though I've been a Python developer for more than a decade, I've recently learned some very nice aspects of this feature.

What's a List Comprehension?

Python is such a strong language in part because of its willingness to steal ideas from other languages. Python list comprehensions are an idea that comes from Haskell. Fundamentally, they are a kind of 'syntactic sugar' for construct lists from other data sources in a tight, elegant fashion.

One of the things I like most about them is they eliminate the need to manually create loop structures and extra variables. So consider the following:

squares=list()
for i in range(10):
    squares.append(i**i)
squares
[1, 1, 4, 27, 256, 3125, 46656, 823543, 16777216, 387420489]

With List Comprehensions we can eliminate both the for loop and the calls to append()

[i**i for i in range(10)]
[1, 1, 4, 27, 256, 3125, 46656, 823543, 16777216, 387420489]

Comprehensions work with any kind of iterable as an import source:

[ord(letter) for letter in "hello world"]
[104, 101, 108, 108, 111, 32, 119, 111, 114, 108, 100]

Multiple generators

To make things a little more complex, we can specifiy more than one input data source:

[(i,j) for i in xrange(2) for j in xrange(3)]
[(0, 0), (0, 1), (0, 2), (1, 0), (1, 1), (1, 2)]

Instead of just boring numbers, we could use this to construct some sentences.

[(number, animal) for number in range(3) for animal in ['cats','dogs','elephants']]
[(0, 'cats'),
 (0, 'dogs'),
 (0, 'elephants'),
 (1, 'cats'),
 (1, 'dogs'),
 (1, 'elephants'),
 (2, 'cats'),
 (2, 'dogs'),
 (2, 'elephants')]

Furthermore, we have a lot of control over how we construct the final output objects - we can put any valid python expression in the left-hand-side.

[
    "{0} {1}".format(adjective,animal)
    for adjective in ['red','cute','hungry']
    for animal in ['cat','puppy','hippo']
]
['red cat',
 'red puppy',
 'red hippo',
 'cute cat',
 'cute puppy',
 'cute hippo',
 'hungry cat',
 'hungry puppy',
 'hungry hippo']

or even

[
    "There are {0} {1} {2}".format(number, adjective,animal)
    for number in range(2,4)
    for adjective in ['cute','hungry']
    for animal in ['puppys','bats']
]
['There are 2 cute puppys',
 'There are 2 cute bats',
 'There are 2 hungry puppys',
 'There are 2 hungry bats',
 'There are 3 cute puppys',
 'There are 3 cute bats',
 'There are 3 hungry puppys',
 'There are 3 hungry bats']

Dictionary Comprehensions

An equally powerful construct is the dictionary comprehension. Just like list comprehensions, this enables you to construct python dictionaries using a very similar syntax.

{
    key:value
    for key,value in [
        ('k','v'),
        ('foo','bar'),
        ('this','that')
    ]
}
{'foo': 'bar', 'k': 'v', 'this': 'that'}

Armed with these tools, we can write very concise code to transform data from one structure to another. Recently I've found them very helpful for unpacking nested data structures.

Consider a simple org-structure:

departments=[
    {'name':'Manufacturing', 'staff': ["Jacob","Jonah", "Chloe","Liam"]},
    {'name':'Marketing','staff':["Emily","Shawn","Alex"]},
    {'name':'HR','staff':["David","Jessica"]},
    {'name':'Accounts','staff':["Nicole"]}
]

Now let's extract some data from it.

#Department names
[department['name'] for department in departments]
['Manufacturing', 'Marketing', 'HR', 'Accounts']
#Staff count
sum([len(department['staff']) for department in departments])
10
#All staff names
[
    name
    for department in departments
    for name in department['staff']
]
['Jacob',
 'Jonah',
 'Chloe',
 'Liam',
 'Emily',
 'Shawn',
 'Alex',
 'David',
 'Jessica',
 'Nicole']

Note how in the last example the second data-generating clause, department['staff'] , used a reference from the first one.

We can take this even further. Let's make our org-chart a little more complicated...

departments=[
    {
        'name':'Manufacturing',
        'staff': [
            {'name':"Jacob",'salary':50000},
            {'name':"Chloe",'salary':60000},
            {'name':"Liam",'salary':70000},
            {'name':"Jonah",'salary':55000},
        ]
    },
    {
        'name':'Marketing',
        'staff':[
            {'name':"Emily",'salary':50000},
            {'name':"Shawn",'salary':45000},
            {'name':"Alex",'salary':40000},
        ]
    },
    {
        'name':'HR',
        'staff':[

            {'name':"David",'salary':50000},
            {'name':"Jessica",'salary':60000},
       ]
    },
    {
        'name':'Accounts',
        'staff':[
            {'name':"Nicole",'salary':40000}
        ]
    }
]

Calculate the total salary:

sum(
    person['salary']
    for department in departments
    for person in department['staff']
)
520000

Now let's calculate the wages bill by department, and put the results in a dictionary

{
    department['name'] : sum(person['salary'] for person in department['staff'])
    for department in departments
}
{'Accounts': 40000, 'HR': 110000, 'Manufacturing': 235000, 'Marketing': 135000}

Conclusion

I've been finding this type of approach very helpful when working with document-oriented data stores. We store a lot of data in JSON documents, either on the file system or in Postgresql. For that data to be useful, we have to be able to quickly mine, explore, select and transform it. Tools like JSONSelect do exist, but JSONSelect is only available in Javascript, and doesn't allow you to do the kind of rich expression-based transforms as you roll up the data that Python does.

I also find that it avoids many common programming pitfalls: mis-assigned variables, off-by-one errors and so on. You'll note that in all the examples above I never need to create a temporary variable or explicitly construct a for -loop.

Remote Systems Administration with Fabric

Thu 01 January 2015


A tool I'm finding myself using more and more these days is Fabric.

Fabric is a python utility and library for streamlining systems administration tasks on multiple machines.

Although I'm primarily a developer and systems architect, I find that as our company grows I keep getting drawn into sysadmin and devops tasks. We now have quite a number of servers which I need to monitor and manage.

Now, as Larry Wall so profoundly said, one of the great virtues of a programmer is laziness, so if there's a way I can perform the same task on multiple machines without having to manually type out the commands dozens of times, then I'm all for it.

Fabric does precisely that. It's written in Python, and its configuration files are python scripts, so there's no need to learn yet another domain-specific language. I have a file called fabfile.py on my local machine that contains a growing collection of little recipes, and with this I can interact with all the servers in our infrastructure.

So for example, if I want to see at a glance which version of linux I'm running on all my servers, I have a task set up in my fabfile like this:

@parallel
def lsb_release():
    run('lsb_release -a')

When I invoke this via:

$ fab lsb_release

I get a nice little print-out of the current version of all my servers. Fabric runs the task in parallel against every host in the env.hosts variable, which can be set at the command line or in the fabfile.

The following example allows me to see a list of every database running on every database server.

DATABASE_HOST_MACHINES=['dbserver1','dbserver2',...]

@hosts(DATABASE_HOST_MACHINES)
def databases():
    with warn_only():
        run('psql -c "select datname from pg_database;"')

And voila, a call to

$ fab databases

gives me a company-wide view of all our databases.

One further demonstration - this blog itself is generated using Fabric! For details, see the fabfile my Github repository.

Reportlab Images in IPython

Thu 01 January 2015


With a bit of work we can get IPython to render ReportLab objects directly to the page as Matplotlib plots.

Huge thanks to github user deeplook, this is basically a modification of this IPython notebook.

First our imports.

from reportlab.lib import colors
from reportlab.graphics import renderPM
from reportlab.graphics.shapes import Drawing, Rect
from reportlab.graphics.charts.linecharts import HorizontalLineChart
from io import BytesIO
from IPython.core import display

Now we create a hook that causes reportlab drawings to actually be rendered when we type out its name.

def display_reportlab_drawing(drawing):
    buff=BytesIO()
    renderPM.drawToFile(drawing,buff,fmt='png',dpi=72)
    data=buff.getvalue()
    ip_img=display.Image(data=data,format='png',embed=True)
    return ip_img._repr_png_()
png_formatter=get_ipython().display_formatter.formatters['image/png']
drd=png_formatter.for_type(Drawing,display_reportlab_drawing)

Now that's done, we can start creating ReportLab objects and see them immediately.

drawing = Drawing(150,100)
drawing.add(Rect(0,0,150,100,strokeColor=colors.black,fillColor=colors.antiquewhite))
drawing
chart=HorizontalLineChart()
drawing.add(chart)
drawing