trvrm.github.io

Software

Using SQLAlchemy and Postgres functions to produce JSON tree structures from SQL joins

Thu 06 July 2017


More and more I'm discovering that Postgres is an amazingly powerful 'NoSQL' database, as well as the best relational database available today.

Since the introduction of the JSON and JSONB data types, I've been able to store both deeply nested, unstructured data AND highly relational data in the same data store.

But sometimes I need to be able to map between the two domains. For example, I want to perform a join across two tables and return the result as a nested tree structure, perhaps for rendering on a webpage.

In the past I might have aggregated the data manually in a loop, but here I demonstrate some neat tricks to get Postgres to do the heavy lifting for you.

I also show how to wrap these tricks in SQLAlchemy expressions. I've started writing my SQL queries almost exclusively in SQLAlchemy, since I discovered that it allows me to think and reason about queries as collections of composable elements.

import sqlalchemy
import pandas
from sqlalchemy.sql import func,select, literal_column
import functools

pandas.set_option("display.width", 500)
pandas.set_option('display.max_colwidth', 110)

engine = sqlalchemy.create_engine('postgresql+psycopg2://demo:password@localhost/demo')
read = functools.partial(pandas.read_sql,con=engine)

Turn a simple join into a nested JSON structure

Consider a database consisting of two tables: book and author.

Each author may have written multiple books. I want a list of authors, and for each author I want a nested list of the books they have written.

Create the tables

engine.execute('''
    DROP TABLE IF EXISTS book;
    DROP TABLE IF EXISTS author;
    CREATE TABLE IF NOT EXISTS author(
        id int primary key,
        name text
    );

    CREATE TABLE IF NOT EXISTS book(
        id int primary key  ,
        author_id int references author,
        name text
    );
''');

Use SQLAlchemy reflection to get objects that represent each table

metadata = sqlalchemy.MetaData(bind=engine)
metadata.reflect()
tables=metadata.tables
Author = tables['author']
Book = tables['book']

Populate the database

engine.execute(Author.insert().values(id=1,name='Douglas Adams'))
engine.execute(Author.insert().values(id=2,name='JK Rowling'))
engine.execute(Author.insert().values(id=3,name='JRR Tolkien'))

engine.execute(Book.insert().values(id=4, author_id=1,name='The Hitchhikers Guide to the Galaxy'))
engine.execute(Book.insert().values(id=5, author_id=1,name='The Restaurant at the End of the Universe'))
engine.execute(Book.insert().values(id=6, author_id=1,name='Life, The Universe, and Everything'))
engine.execute(Book.insert().values(id=7, author_id=2,name='Harry Potter and the Giant Plot Hole'))
engine.execute(Book.insert().values(id=8, author_id=3,name='The Silmarillion'))
engine.execute(Book.insert().values(id=9, author_id=3,name='The Lord of the Rings'));
read(Author.select())
id name
0 1 Douglas Adams
1 2 JK Rowling
2 3 JRR Tolkien
read(Book.select())
id author_id name
0 4 1 The Hitchhikers Guide to the Galaxy
1 5 1 The Restaurant at the End of the Universe
2 6 1 Life, The Universe, and Everything
3 7 2 Harry Potter and the Giant Plot Hole
4 8 3 The Silmarillion
5 9 3 The Lord of the Rings

The problem: JOIN creates multiple rows per author

read(
    select([
        Author.join(Book)
    ])
)
id name id author_id name
0 1 Douglas Adams 4 1 The Hitchhikers Guide to the Galaxy
1 1 Douglas Adams 5 1 The Restaurant at the End of the Universe
2 1 Douglas Adams 6 1 Life, The Universe, and Everything
3 2 JK Rowling 7 2 Harry Potter and the Giant Plot Hole
4 3 JRR Tolkien 8 3 The Silmarillion
5 3 JRR Tolkien 9 3 The Lord of the Rings

The goal

It would be far more helpful to have a query that returns three rows - one for each author, with each author's books contained in a sub list.

We do that by using two powerful Postgres techniques:

Specifically we use the function json_agg to roll up a set of books into a JSON list

frame = read('''
    WITH author_books AS (SELECT author_id, json_agg(book) FROM book GROUP BY author_id)

    SELECT * FROM author
     JOIN author_books ON author_books.author_id=author.id 

''')

frame
id name author_id json_agg
0 1 Douglas Adams 1 [{'id': 4, 'name': 'The Hitchhikers Guide to the Galaxy', 'author_id': 1}, {'id': 5, 'name': 'The Restarau...
1 3 JRR Tolkien 3 [{'id': 8, 'name': 'The Silmarillion', 'author_id': 3}, {'id': 9, 'name': 'The Lord of the Rings', 'author...
2 2 JK Rowling 2 [{'id': 7, 'name': 'Harry Potter and the Giant Plot Hole', 'author_id': 2}]

And because we're using Pandas dataframes, we even have a convenience function to turn this directly into a nested Python dictionary:

frame.to_dict('records')
[{'author_id': 1,
  'id': 1,
  'json_agg': [{'author_id': 1,
    'id': 4,
    'name': 'The Hitchhikers Guide to the Galaxy'},
   {'author_id': 1,
    'id': 5,
    'name': 'The Restaurant at the End of the Universe'},
   {'author_id': 1, 'id': 6, 'name': 'Life, The Universe, and Everything'}],
  'name': 'Douglas Adams'},
 {'author_id': 3,
  'id': 3,
  'json_agg': [{'author_id': 3, 'id': 8, 'name': 'The Silmarillion'},
   {'author_id': 3, 'id': 9, 'name': 'The Lord of the Rings'}],
  'name': 'JRR Tolkien'},
 {'author_id': 2,
  'id': 2,
  'json_agg': [{'author_id': 2,
    'id': 7,
    'name': 'Harry Potter and the Giant Plot Hole'}],
  'name': 'JK Rowling'}]

So now we have our data in a form which would be very easy to use in the templating language of your choice when building a web application.

Ok, but can I do that in SQLAlchemy?

I'm glad you asked. First I define a little helper function to represent the underlying json_agg function.

def json_agg(table):
    return func.json_agg(literal_column('"'+ table.name+'"'))

Then I create my CTE:

AuthorBooks = (
    select([
        Book.c.author_id,
        json_agg(Book).label('books')
    ])
    .select_from(Book)
    .group_by(Book.c.author_id)
).cte('author_books')

And finally I use my CTE exactly as if it were a real table:

query=(
    select([
        Author,
        AuthorBooks
    ])
    .select_from(
        Author.join(AuthorBooks)
    )
)
frame=read(query)
frame
id name author_id books
0 1 Douglas Adams 1 [{'id': 4, 'name': 'The Hitchhikers Guide to the Galaxy', 'author_id': 1}, {'id': 5, 'name': 'The Restarau...
1 3 JRR Tolkien 3 [{'id': 8, 'name': 'The Silmarillion', 'author_id': 3}, {'id': 9, 'name': 'The Lord of the Rings', 'author...
2 2 JK Rowling 2 [{'id': 7, 'name': 'Harry Potter and the Giant Plot Hole', 'author_id': 2}]

And as before we can turn this into a nested Python data structure

authors = frame.to_dict('records')
authors[0]['name']
'Douglas Adams'
authors[0]['books']
[{'author_id': 1, 'id': 4, 'name': 'The Hitchhikers Guide to the Galaxy'},
 {'author_id': 1,
  'id': 5,
  'name': 'The Restaurant at the End of the Universe'},
 {'author_id': 1, 'id': 6, 'name': 'Life, The Universe, and Everything'}]

What about many-to-many joins?

Let's consider a slightly more complex example, that of 'users' and 'groups'.

(As an extra bit of fun, both user and group are reserved keywords in Postgres, so we have to be careful with our quoting to make this work)

engine.execute('''
    DROP TABLE IF EXISTS "user_to_group";
    DROP TABLE IF EXISTS "group";
    DROP TABLE IF EXISTS "user";


    CREATE TABLE IF NOT EXISTS "group"(
        id int primary key,
        name text
    );
    CREATE TABLE IF NOT EXISTS "user"(
        id int primary key,
        name text
    );
    CREATE TABLE IF NOT EXISTS "user_to_group"(
        group_id int references "group",
        user_id int references "user"
        );
''');
metadata = sqlalchemy.MetaData(bind=engine)
metadata.reflect()
tables=metadata.tables

User        = tables['user']
Group       = tables['group']
UserToGroup = tables['user_to_group']

Populate the data

We'll create three groups and five users, some of whom may be in more than one group

inserts=[
    Group.insert().values(id=1,name='Hobbits'),
    Group.insert().values(id=2,name='Wizards'),
    Group.insert().values(id=3,name='The Fellowship'),

    User.insert().values(id=1,name='Frodo'),
    User.insert().values(id=2,name='Gandalf'),
    User.insert().values(id=3,name='Legolas'),
    User.insert().values(id=4,name='Pippin'),
    User.insert().values(id=5,name='Saruman'),


    UserToGroup.insert().values(user_id=1,group_id=1),
    UserToGroup.insert().values(user_id=4,group_id=1),
    UserToGroup.insert().values(user_id=2,group_id=2),
    UserToGroup.insert().values(user_id=5,group_id=2),


    UserToGroup.insert().values(user_id=1,group_id=3),
    UserToGroup.insert().values(user_id=2,group_id=3),
    UserToGroup.insert().values(user_id=3,group_id=3),
    UserToGroup.insert().values(user_id=4,group_id=3),
]
for i in inserts:
    engine.execute(i)

A simple join gives us all our data, but in a form that may be clunky to work with.

read(Group.join(UserToGroup).join(User).select())
id name group_id user_id id name
0 1 Hobbits 1 1 1 Frodo
1 1 Hobbits 1 4 4 Pippin
2 2 Wizards 2 2 2 Gandalf
3 2 Wizards 2 5 5 Saruman
4 3 The Fellowship 3 1 1 Frodo
5 3 The Fellowship 3 2 2 Gandalf
6 3 The Fellowship 3 3 3 Legolas
7 3 The Fellowship 3 4 4 Pippin

Instead, let's create two queries

In SQL, it looks like this:

read('''
    WITH user_groups AS (
        SELECT user_id, json_agg("group") AS groups
          FROM user_to_group 
          JOIN "group" 
            ON user_to_group.group_id="group".id
        GROUP BY user_id  

    )

    SELECT id,name,groups FROM "user"
     JOIN user_groups on "user".id = user_groups.user_id

''')
id name groups
0 4 Pippin [{'id': 1, 'name': 'Hobbits'}, {'id': 3, 'name': 'The Fellowship'}]
1 1 Frodo [{'id': 1, 'name': 'Hobbits'}, {'id': 3, 'name': 'The Fellowship'}]
2 5 Saruman [{'id': 2, 'name': 'Wizards'}]
3 3 Legolas [{'id': 3, 'name': 'The Fellowship'}]
4 2 Gandalf [{'id': 2, 'name': 'Wizards'}, {'id': 3, 'name': 'The Fellowship'}]

But we want to use SQLAlchemy, so again we create CTE objects to help us

A list of users showing the groups they belong to

UserGroups=(
    select([
        UserToGroup.c.user_id,
        json_agg(Group).label('groups')
    ])
    .select_from(Group.join(UserToGroup))
    .group_by(UserToGroup.c.user_id)
).cte('user_groups')
query=(
    select([
        User,
        UserGroups.c.groups
    ])
    .select_from(
        User.join(UserGroups,User.c.id==UserGroups.c.user_id)
    )
)
read(query)
id name groups
0 4 Pippin [{'id': 1, 'name': 'Hobbits'}, {'id': 3, 'name': 'The Fellowship'}]
1 1 Frodo [{'id': 1, 'name': 'Hobbits'}, {'id': 3, 'name': 'The Fellowship'}]
2 5 Saruman [{'id': 2, 'name': 'Wizards'}]
3 3 Legolas [{'id': 3, 'name': 'The Fellowship'}]
4 2 Gandalf [{'id': 2, 'name': 'Wizards'}, {'id': 3, 'name': 'The Fellowship'}]

A list of groups showing the users that are members of them

GroupUsers=(
    select([
        UserToGroup.c.group_id,
        json_agg(User).label('users')
    ])
    .select_from(User.join(UserToGroup))
    .group_by(UserToGroup.c.group_id)
).cte('group_users')
query=(
    select([
        Group,
        GroupUsers.c.users
    ])
    .select_from(
        Group.join(GroupUsers,Group.c.id==GroupUsers.c.group_id)
    )
)
read(query)
id name users
0 1 Hobbits [{'id': 1, 'name': 'Frodo'}, {'id': 4, 'name': 'Pippin'}]
1 3 The Fellowship [{'id': 1, 'name': 'Frodo'}, {'id': 2, 'name': 'Gandalf'}, {'id': 3, 'name': 'Legolas'}, {'id': 4, 'name':...
2 2 Wizards [{'id': 2, 'name': 'Gandalf'}, {'id': 5, 'name': 'Saruman'}]

And again, we can always convert this to a nested Python data structure

read(query).to_dict('records')
[{'id': 1,
  'name': 'Hobbits',
  'users': [{'id': 1, 'name': 'Frodo'}, {'id': 4, 'name': 'Pippin'}]},
 {'id': 3,
  'name': 'The Fellowship',
  'users': [{'id': 1, 'name': 'Frodo'},
   {'id': 2, 'name': 'Gandalf'},
   {'id': 3, 'name': 'Legolas'},
   {'id': 4, 'name': 'Pippin'}]},
 {'id': 2,
  'name': 'Wizards',
  'users': [{'id': 2, 'name': 'Gandalf'}, {'id': 5, 'name': 'Saruman'}]}]

Conclusion

I demonstrate how to use WITH statements (Common Table Expressions), the json_agg function and SQLAlchemy to quickly convert complex SQL joins into nested Python data structures.

Using techniques like the ones presented here, Postgres can act as a powerful relational data store that can still provide applications with data in helpful forms, such as nested dictionaries and lists.

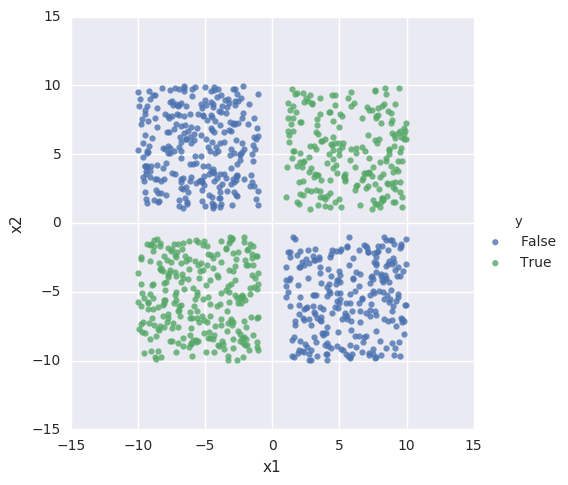
Image recognition with Keras, Tensorflow, and InceptionV3

Fri 17 March 2017


Neural networks are a powerful tool for teaching computers to recognize complex patterns, and now tools like Keras and TensorFlow are beginning to make them a practical tool for programmers who don't have a PhD in machine learning.

One very powerful aspect of these tools is the ability to share pre-trained models with others. There are many tutorials and courses that will walk you through the process of building a neural net and training it on some data set. But in other areas of software development we are far more likely to use off-the-shelf implementations of common algorithms rather than rolling them ourselves. We might work through implementing a sort algorithm or a binary tree in order to better understand the concepts, but having done so we almost always end up using the algorithms that come built in to our language or programming environment.

I suspect we'll see the same sort of thing happen in the machine learning world. While being able to train models on our own data will continue to be extremely valuable, there will be many cases where a model already exists that does what we want, and we'll just want to plug it in to our data.

Keras already provides some pre-trained models: in this article, I'll use the Inception V3 model to classify an image.

import numpy as np
import keras
from keras.preprocessing import image
from keras.applications.inception_v3 import decode_predictions
from keras.applications.inception_v3 import preprocess_input

Load the pre-trained model

inception=keras.applications.inception_v3.InceptionV3(
    include_top=True, 
    weights='imagenet', 
    input_tensor=None, 
    input_shape=None
)

(This actually downloads the weights from github. Keras saves your model files in ~/.keras/models in the HDF5 file format.)

!ls  ~/.keras/models
inception_v3_weights_tf_dim_ordering_tf_kernels.h5
inception
<keras.engine.training.Model at 0x7f6946e537b8>
inception.summary()
____________________________________________________________________________________________________
Layer (type)                     Output Shape          Param #     Connected to                     
====================================================================================================
input_1 (InputLayer)             (None, 299, 299, 3)   0                                            
____________________________________________________________________________________________________
conv2d_1 (Conv2D)                (None, 149, 149, 32)  864                                          
____________________________________________________________________________________________________
batch_normalization_1 (BatchNorm (None, 149, 149, 32)  96


(snipped several hundred lines here...)


mixed10 (Concatenate)            (None, 8, 8, 2048)    0                                            
____________________________________________________________________________________________________
avg_pool (GlobalAveragePooling2D (None, 2048)          0                                            
____________________________________________________________________________________________________
predictions (Dense)              (None, 1000)          2049000                                      
====================================================================================================
Total params: 23,851,784.0
Trainable params: 23,817,352.0
Non-trainable params: 34,432.0
____________________________________________________________________________________________________

Now let's load an image and see if Inception can recognize it

img = image.load_img('./hamster.jpg',target_size=(299,299))
img

png

Keras requires the input data to be in a specific shape.

x = image.img_to_array(img)
x = np.expand_dims(x, axis=0)
x = preprocess_input(x)
x.shape
(1, 299, 299, 3)
predictions = inception.predict(x)
prediction  = decode_predictions(predictions)[0][0]
prediction
('n02342885', 'hamster', 0.91639304)

And we're done

Inception is pretty confident that this is a picture of a hamster. Without having to do any training ourselves, or really having to know anything at all about neural networks, we've leveraged a publicly available model to classify our image.

Basic Keras Example

Sun 26 February 2017


Keras is a high-level neural network Python library, designed to sit on top of lower level implementations such as TensorFlow.

It provides abstractions that enable you to quickly create neural network structures. Here I'm going to try to create a simple 3 layer network, and use it to solve a basic classification problem.

For reference, the problem I'm trying to solve, and the network I'm using to solve it, are roughly equivalent to this interactive example at playground.tensorflow.org

Tell Jupyter to display matlplotlib plots directly in the notebook

%matplotlib inline

Imports

A lot of machine learning work ends up being about 'housekeeping' - finding, filtering, parsing, loading data, transforming it into a usable shape, and so on. The Pandas library is excellent for this type of work

import pandas as pd

Numpy is commonly used for creating and managing arrays of numbers and performing a wide variety of mathematical operations on them. Matplotlib and seaborn provide a number of useful plotting functions.

import numpy as np
import matplotlib.pyplot as pl
import seaborn
seaborn.set()

TensorFlow is Google's Machine Learning library

import tensorflow as tf

This is a useful function for splitting data sets into training and testing subsets.

from sklearn.model_selection import train_test_split

And finally Keras is the library I actually want to explore. My understanding is that it provides a high-level abstraction to common TensorFlow operations

import keras
from keras.layers import Dense, Activation

Create training data.

I'm going to create an array of data with two features, x1 and x2

data = pd.DataFrame(np.random.random((1500,2))*20 - 10,columns=['x1','x2'])

For simpler visualisation, I'm going to filter out values that lie very close to the axes.

data= data[(np.abs(data.x1)>1)& (np.abs(data.x2)>1)][0:1000]

And then for each (x1,x2) pair, I'm going to assign a value y that is true if x*y is greater than 0.

data['y']=((data.x1*data.x2)>0)
data.head()
x1 x2 y
0 -4.131299 -2.266670 True
1 9.359900 -3.169526 False
2 -5.079496 -7.030525 True
3 8.475884 -4.005687 False
5 5.072955 -3.757722 False

Visualize the input data

Seaborn provides a function that gives me exactly the visualization that I want:

seaborn.lmplot(x="x1", y="x2", hue="y", data=data,fit_reg=False)
<seaborn.axisgrid.FacetGrid at 0x7efd8407dd68>

png

So we have two classes, and we're going to see if we can create a neural network that can distinguish between the two.

Create training data and test data

We assign 80% of the data to the training set, with the remaining 20% left over for testing the accuracy of our hypothesis.

train,test=train_test_split(data,train_size=0.8)
len(train), len(test)
(800, 200)

Keras seems to require input data in the form of Numpy arrays, so we extract those from our Pandas dataframe:

X_train = train[['x1','x2']].values
Y_train = train['y'].values

Define a neural network

Now we can use Keras to define our network. I'm going to specify a network with an input layer, an output layer, and a 4-node hidden layer.

model=keras.models.Sequential()

model.add(Dense(output_dim=4, input_dim=2,activation='tanh'))
model.add(Dense(output_dim=2,  activation='tanh'))
model.add(Dense(output_dim=1,  activation='tanh'))

Train the network

This is the bit that would take considerably more lines of code in a lower-level library. I can tweak parameters such as the cost function, the optimizer and so on. Here I choose a mean-squared-error cost function and a stochastic gradient descent optimizer.

I haven't yet figured out how to change the learning rate, which would be very helpful to know.

%%time
model.compile(loss='mean_squared_error', optimizer='sgd')

model.fit(X_train,
          Y_train,
          nb_epoch=250,
          batch_size=40,
          verbose=0)
CPU times: user 3.26 s, sys: 40 ms, total: 3.3 s
Wall time: 3.34 s

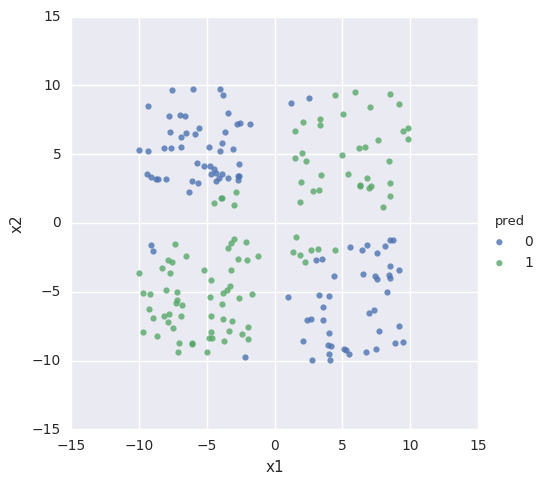
Having trained the network, check it against the test data.

plotPrediction runs the predict_classes method to attempt to classify the test data we provide, and then displays its guesses:

def plotPrediction(data,model):
    X = data.ix[:,:-1].values
    Y = data['y'].values

    d=data.copy()
    d['pred']=model.predict_classes(X,verbose=0).reshape(len(X))

    matches = (d['pred']==Y)
    accuracy = 100* matches.sum()/matches.count()

    print("Accuracy: {}%".format(accuracy))        #I'd rather compute an F-Score here.

    seaborn.lmplot(x="x1", y="x2", hue="pred", data=d,fit_reg=False)
plotPrediction(test,model)
Accuracy: 91.5%

png

Conclusion

So we see that after 250 training cycles, the network can mostly correctly identify input data.

Because the network is initialized with random data at the beginning of every run, sometimes I get better results than this and sometimes worse. And Keras gives me many ways of quickly tweaking my algorithm - I can adjust the number of nodes in each layer, the number of layers, the activation function, the cost function, the number of training cycles, the test/training split and so on.

Next I'd like to figure out how to adjust regularization parameters and the learning rate, and explore how that affects the efficiency of the network.

Source

The source for this post is available here on github

Using TensorFlow to compute gradients

Thu 09 February 2017


I tried the basic linear regression example from this article. I was quite surprised by this line:

train_step = tf.train.GradientDescentOptimizer(0.0000001).minimize(cost)                       

because it didn't seem to require me to tell the GradientDescentOptimizer what the first derivative of my cost function is. Previously when I've used gradient descent, I've had to manually specify what the gradients with respect to my parameters as well as the cost function.

A bit of reading indicates that TensorFlow can compute gradients for a given computation graph. Let's have a look at a basic example.

%matplotlib inline
import tensorflow as tf
import numpy as np
from math import pi
import matplotlib.pyplot as mp
import seaborn
seaborn.set()

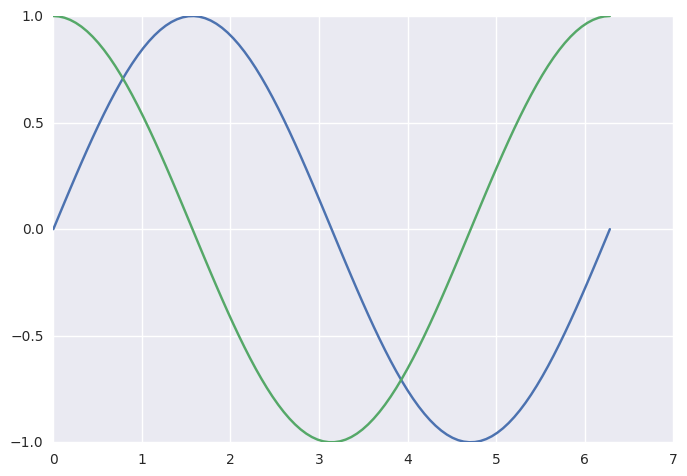
We'll compute the derivative of the sin function over the range 0 to 2*pi

x_=np.linspace(0,pi*2,100)

I'm still learning the relationship between Python variables and TensorFlow placeholders.

Here x_ and y_ are Python variables, x and y are TensorFlow tensors

x=tf.placeholder(tf.float32)
y=tf.sin(x)
x
<tf.Tensor 'Placeholder_3:0' shape=<unknown> dtype=float32>
y
<tf.Tensor 'Sin_3:0' shape=<unknown> dtype=float32>

Now we ask TensorFlow to compute both the sin function AND the first derivative.

with tf.Session() as session:
    feed_dict = {x:x_}
    y_  = session.run(y,feed_dict=feed_dict)
    out = session.run(tf.gradients(y,x),feed_dict=feed_dict)
    gradient=out[0]
mp.plot(x_,y_)
mp.plot(x_,gradient)

png

Note that I haven't had to declare anywhere that the first derivative of sine(x) is cosine(x). TensorFlow seems to be able to figure that out analytically, which is pretty cool.

Fractal Dimension

Tue 24 January 2017


Inspired by the keynote given at PyCon Portland by K Lars Lohn,, I wanted to try my hand at computing the fractal dimension of a few different images.

This is a very simple implementation of a box counting algorithm.

A couple of ideas are borrowed from https://github.com/twobraids/fracdim.

First some imports:

import pandas
import math
from IPython.display import display
from PIL import Image
import os
from  scipy.stats import linregress

Then a function to create simple black and white images.

def bw(img):
    gray = img.convert('L')
    return gray.point(lambda x: 0 if x<128 else 1, '1')

Some sample images. Basically, I expect the fractal dimension of the Canadian coastline to be higher than that of, say, a square.

texas=bw(Image.open('./images/texas.gif'))
tree=bw(Image.open('./images/tree.jpg'))
canada=bw(Image.open('./images/Canada.png'))
square=bw(Image.open('./images/square.jpg'))

At various different scales, I want to divide each image up into squares and then count how many squares have at least one black pixel in them.

def interesting(image):
    #true if any data is 0, i.e. black
    return 0 in set(image.getdata())

This function chops an image up into

def interesting_box_count(image, length):
    width,height=image.size

    interesting_count=0
    box_count=0
    for x in range(int(width/length)):
        for y in range(int(height/length)):
            C=(x*length,y*length,length*(x+1),length*(y+1))

            chopped = image.crop(C)
            box_count+=1
            if (interesting(chopped)):
                interesting_count+=1        

    assert box_count
    assert interesting_count
    return interesting_count

This returns pairs of numbers. One represents the scale, the other the (log) count of boxes at that scale that have black pixels in them.

def getcounts(image):
    length=min(image.size)
    while(length>5):
        interesting = interesting_box_count(image,length)
        yield math.log(1.0/length), math.log(interesting)
        length=int(length/2)

def counts(image):
    return pandas.DataFrame(getcounts(image),columns=["x","y"])
def dimension(image):
    frame=counts(image)
    return linregress(frame.x,frame.y)

And finally, armed with lists of pairs, we compute the slope we'd get if we plotted them against each other.

def analyse(image):
    c=counts(image)
    print("Fractal Dimension:",linregress(c.x,c.y).slope)

Results

square

png

analyse(square) 
Fractal Dimension: 1.26420823227
texas

png

analyse(texas)
Fractal Dimension: 1.45764518178
canada

png

analyse(canada)
Fractal Dimension: 1.52450994232
tree

png

analyse(tree)
Fractal Dimension: 1.82487974473

Which is exactly what we expected.

As K Lars Lohn said in his keynote, it's very rewarding when you try something out in Python and the result actually matches neatly up with the theory!

New Blog Theme

Fri 13 May 2016


Yesterday I discovered the Bulma CSS library. It seems to be basically 'bootstrap for the flexbox world.'

Given that Bootstrap version 4 has been promising us Flexbox support for nearly a year now, I think Bulma could be my new best CSS friend. Of course, I won't be able to use it anywhere where I have to support even reasonably old browsers, but so far it's been very pleasant to work with.

I also used this opportunity to learn how to create themes for Pelican. I basically took the 'simple' theme from the Pelican distribution and systematically rewrote each template to use Bulma classes. Here's an example from the article.html template

<section class="section">
    <div class="container">
        <p class="subtitle is-4">
            {{ article.locale_date }}
        </p>

        <h2 class="title is-2">
            <a href="{{ SITEURL }}/{{ article.url }}" rel="bookmark" title="Permalink to {{ article.title|striptags }}">
                {{ article.title }}
            </a>
        </h2>
        ...

Pelican, Atom and Markdown

Fri 26 June 2015


I've been using reStructured text in general to write this blog, but I think I'm going to be switching to Markdown. As an experiment, I'm writing this post in Markdown.

I'm also writing it in the Atom text editor, which has really come on a long way since I last tried it. Specifically, it includes a Markdown preview function, so I can see the effects of the markup that I'm writing as I write it.

Mostly, I want a rapid way of creating and publishing code snippets, without the mental overhead of switching between markup languages. Although reStructured text and markdown are broadly similar, there are subtle differences between them when it comes to things like syntax highlighting. But I've discovered today that if I use the triple-backtick syntax, I can get the same output from Pelican, Atom, and IPython notebooks.

So

    ```python
    def syntax(highlighting=True):
        return "cool huh?"
    ```

yields

 def syntax(highlighting=True):
   return "cool huh?"

And if I paste that into a markdown cell in an IPython notebook, I get the same effect, as can be seen here

So this seems to be the general way that the open-source ecosystem is going: Markdown allows me to use the same syntax for my GitHub documentation, my IPython notebooks, and my blog posts.

I do use Sphinx in various places for Python code documentation, so that will still require reStructured text, but elsewhere I think Markdown is the way to go

Asynchronous Python

Thu 01 January 2015


It's possible to get python to do node-like non-blocking requests, this could take away one of the key reasons for using node.

The following is a full bottle-based python web application.

A client can sucessfully call /test while another client is waiting for /slowproxy to return a result from a slow web service.

from gevent import monkey; monkey.patch_all()

from bottle import route, run
import time

@route('/sleep/<seconds:int>')
def sleep(seconds):
    time.sleep(seconds)
    return "Slept For {0}".format(seconds)

@route('/test')
def test():
     return 'test'


@route('/slowproxy/<seconds:int>')
def slowproxy(seconds):
    import requests
    url="https://s.nooro.com/sleeptest.php?seconds=%i" %seconds
    response=requests.get(url)
    response.raise_for_status()
    return response.text

run(host='0.0.0.0', port=8080,server='gevent')

My first attempt used grequests, but apparently that's not even necessary.

I guess that the call to monkey.patch_all() even patches the socket code that requests uses. I'm very impressed.